Install OpenShift IPI for homelab on Hetzner Root servers
Warning: This document / project / repository / playbooks should be used only for testing OpenShift Container Platform 4.x and NOT for production environments.
In this article, I’ll explain how to deploy Red Hat OpenShift Container Platform using the Hetzner Root Server(s), this guide is similar to my previously Install OpenShift baremetal IPI on homelab, using nested virtualization, but on this case the KVM hosts will be Hetzner Root Servers, upon them (or it) you will have OpenShift baremetal IPI installed using nested virtualization.
Install CentOS Stream 8
On all your Hetzner Root Server install CentOS Stream 8 operating system.
Before going further I’d suggest to upload your SSH public key to Hetzner robot navigating to Server => click on Key management and then you can click to New key; in the new window set a name and paste your public key content in Key data;
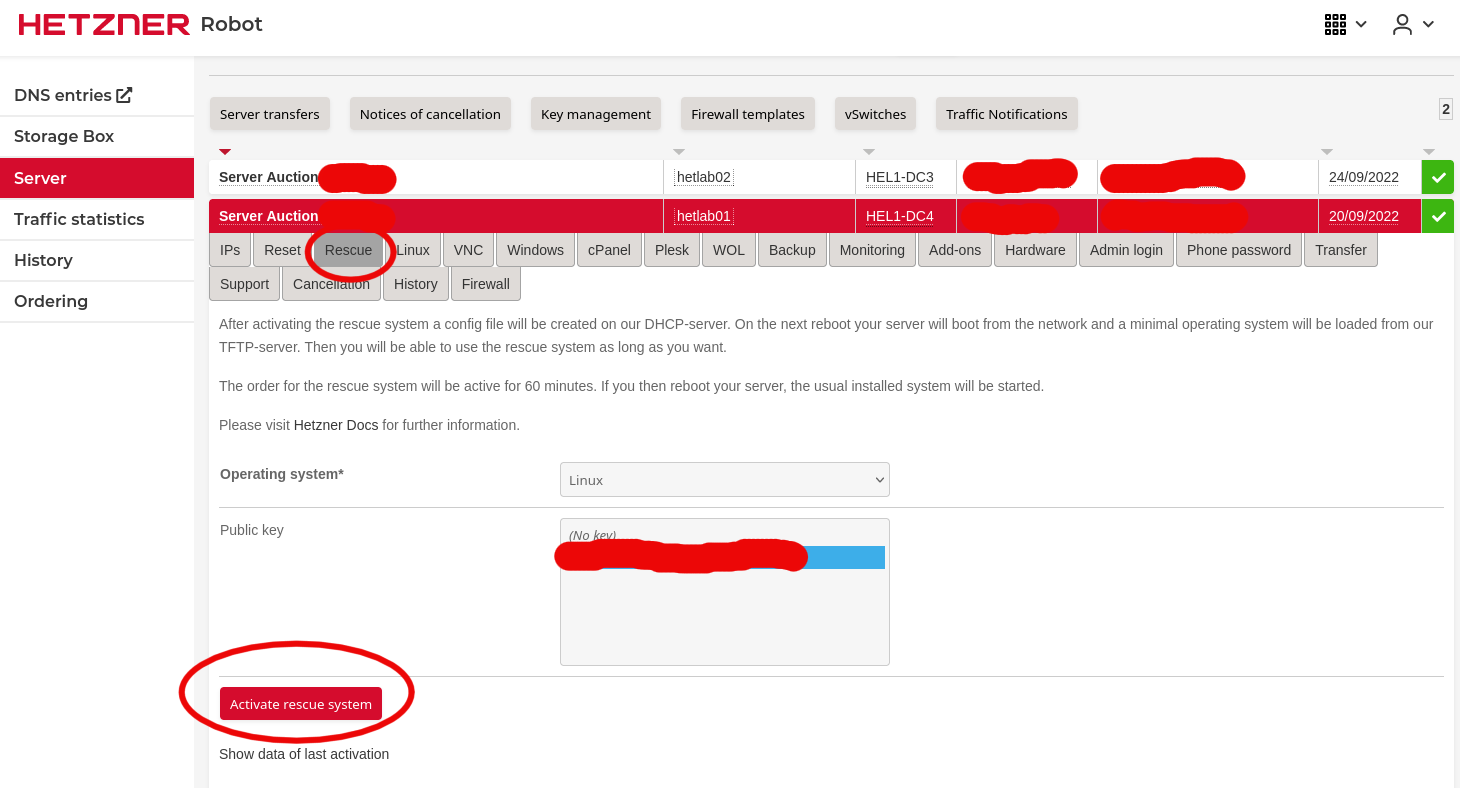
- activate Rescue system by logging in to your robot account, then navigate to Server tab => select your Root Server => select the Rescue sub tab => click to Activate rescue system button:
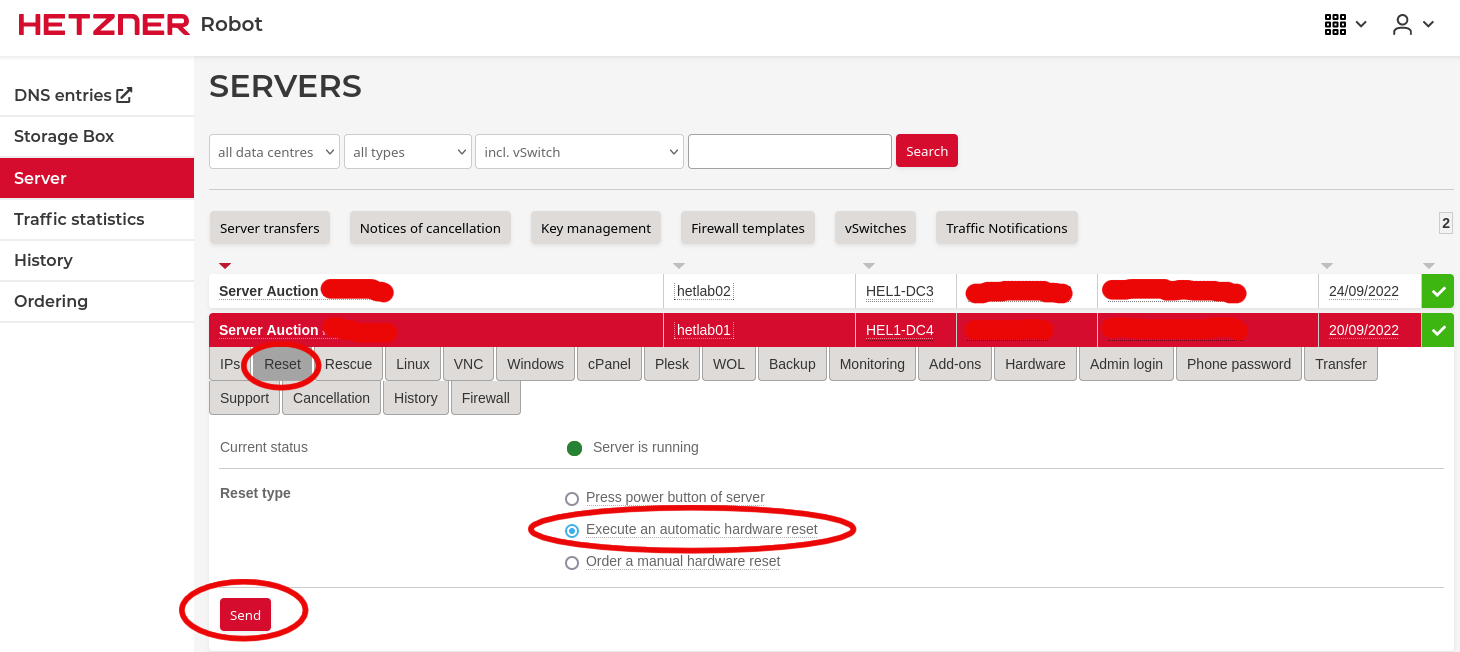
- Reset your server in order to reboot in rescue mode; for this you can simply run
rebooton SSH, or you can send a reset using Hetzner robot by selecting Reset sub menu => set Reset type to Execute an automatic hardware reset => click on the Send button:
-
wait until your root server is rebooted in rescue mode;
-
connect in SSH to your Root server and wipe all your disks:
root@rescue ~ # dd if=/dev/zero of=/dev/nvme0n1 bs=1M count=10000 oflag=direct status=progress
root@rescue ~ # dd if=/dev/zero of=/dev/nvme1n1 bs=1M count=10000 oflag=direct status=progress

root@rescue ~ # dd if=/dev/zero of=/dev/sda bs=1M count=10000 oflag=direct status=progress
root@rescue ~ # dd if=/dev/zero of=/dev/sdb bs=1M count=10000 oflag=direct status=progress
- run
installimage:
root@rescue ~ # installimage
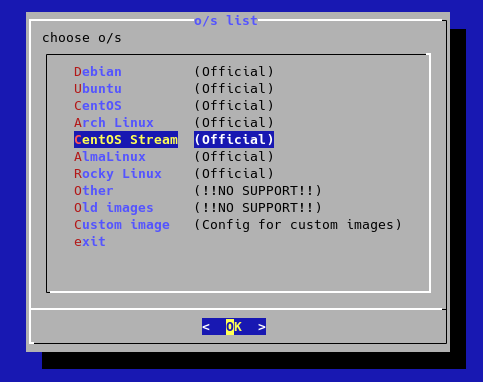
- select CentOS Stream 8:
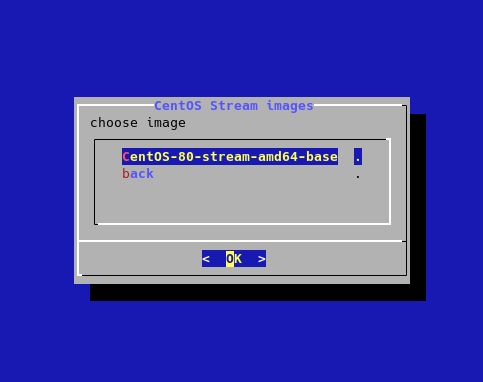
- press enter:
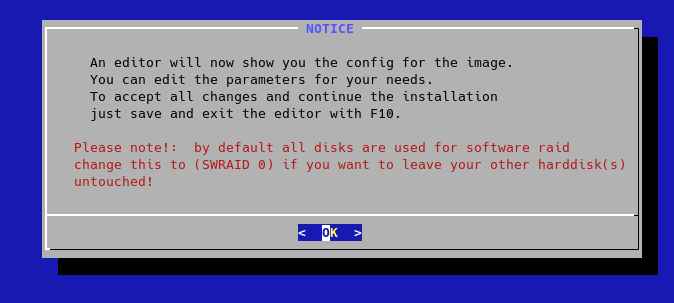
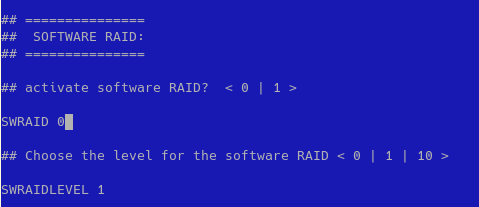
- disable software RAID:
REMEMBER: this guide is for automating you OpenShift Lab and NOT for production environment(s)
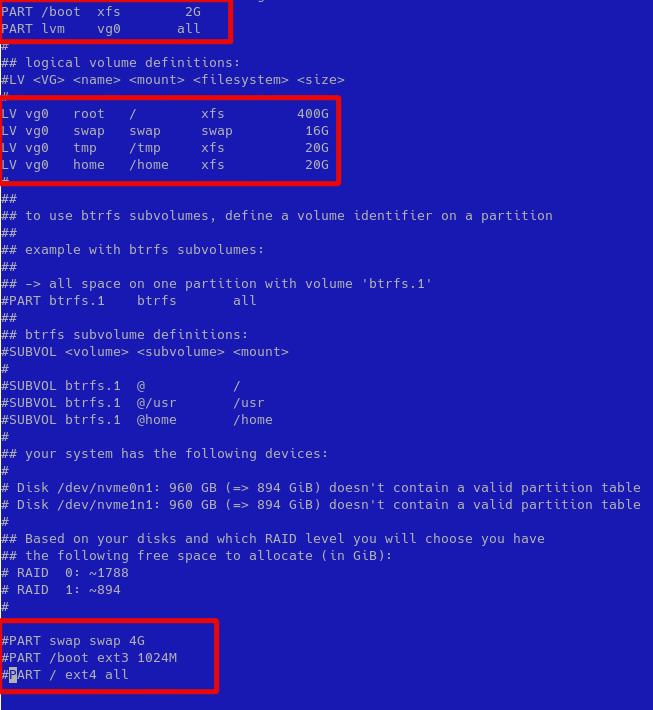
- create two partitions, one for boot with 2G dimension and second one with lvm using all remaining space; then create four logical volume, but remember to use xfs for file system and to give at least 20G for /tmp file system (sushy-emulator will use /tmp to build iso files); finally comment default Hetzner three partitions:
- press ESC and then with arrow keys select Save before close:

- press enter to confirm:


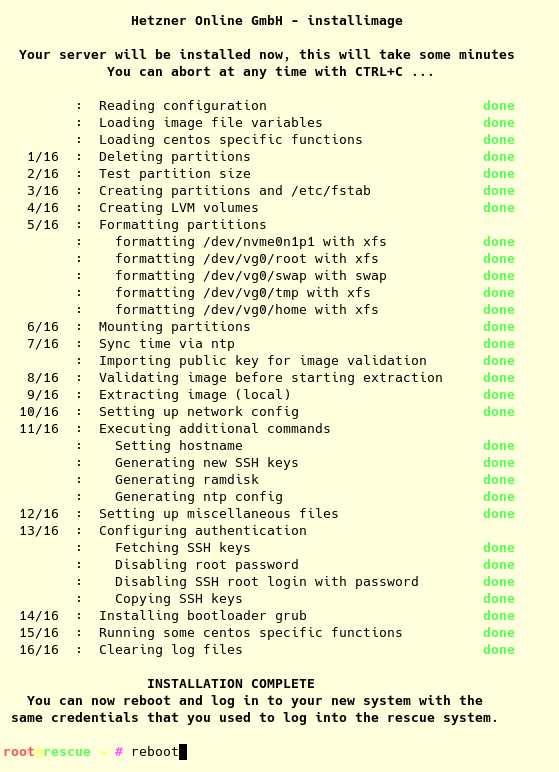
- wait until the installation is completed and then
reboot:
- repeat above installation steps for all your Hetzner Root Servers.
Create baremetal VLAN
On Hetzner Root Server you can use vSwitch to connect multiple servers to the same VLAN.
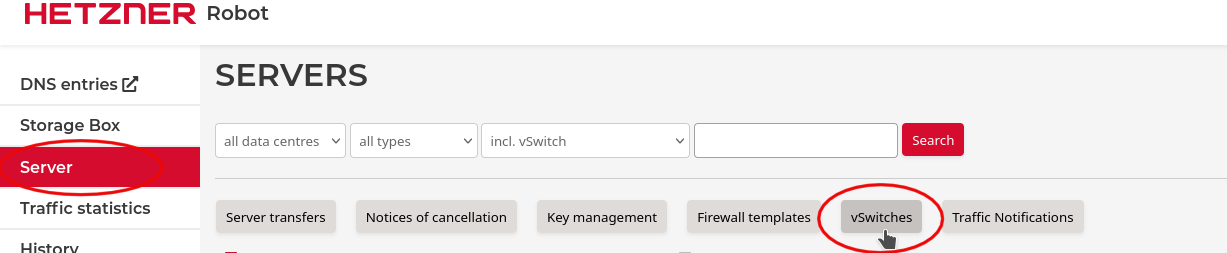
- select Server => vSwitches:
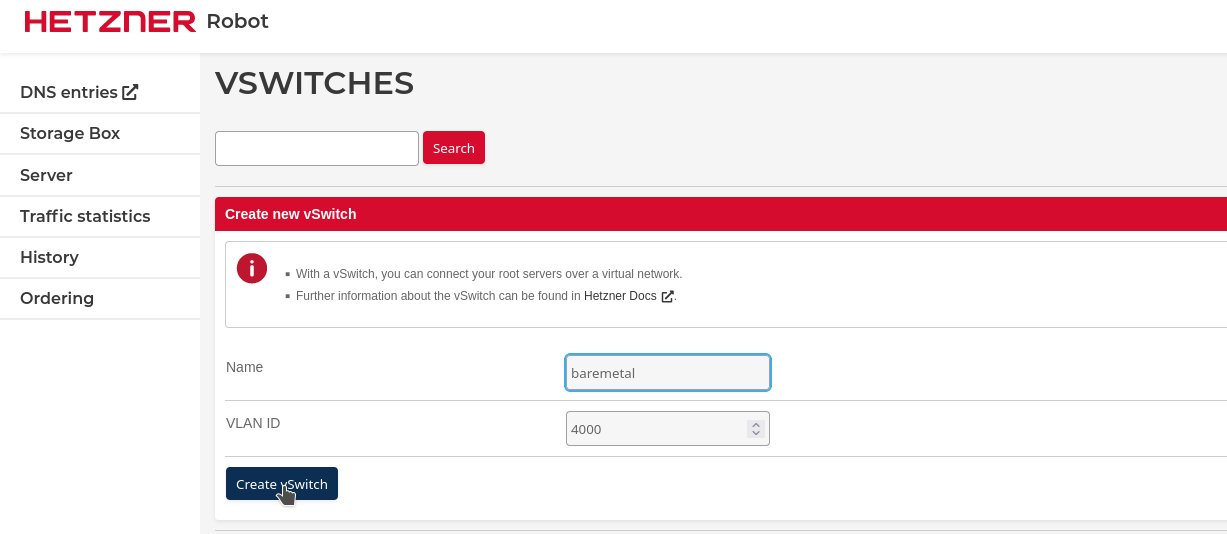
- create a baremetal vSwitch with 4000 VLAN ID, then click on Create vSwitch:
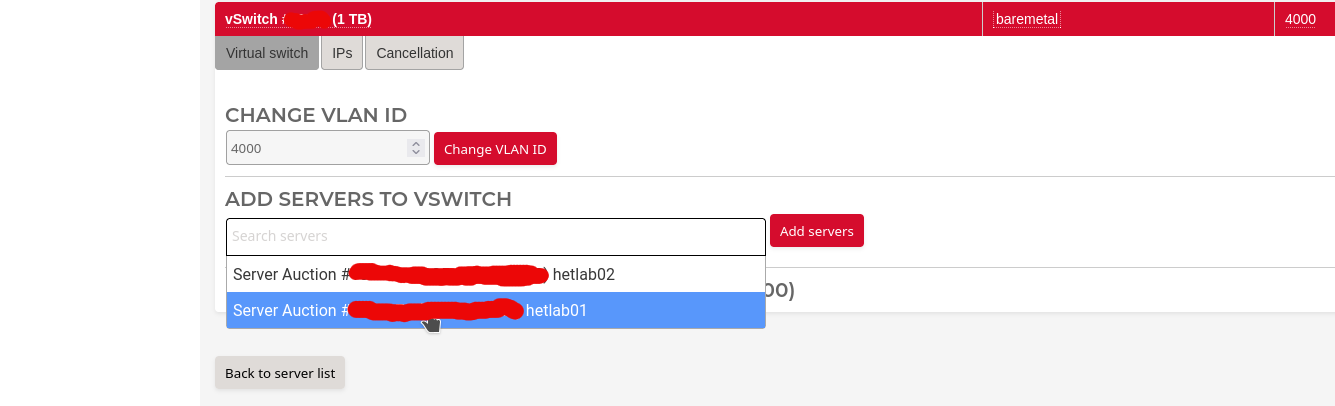
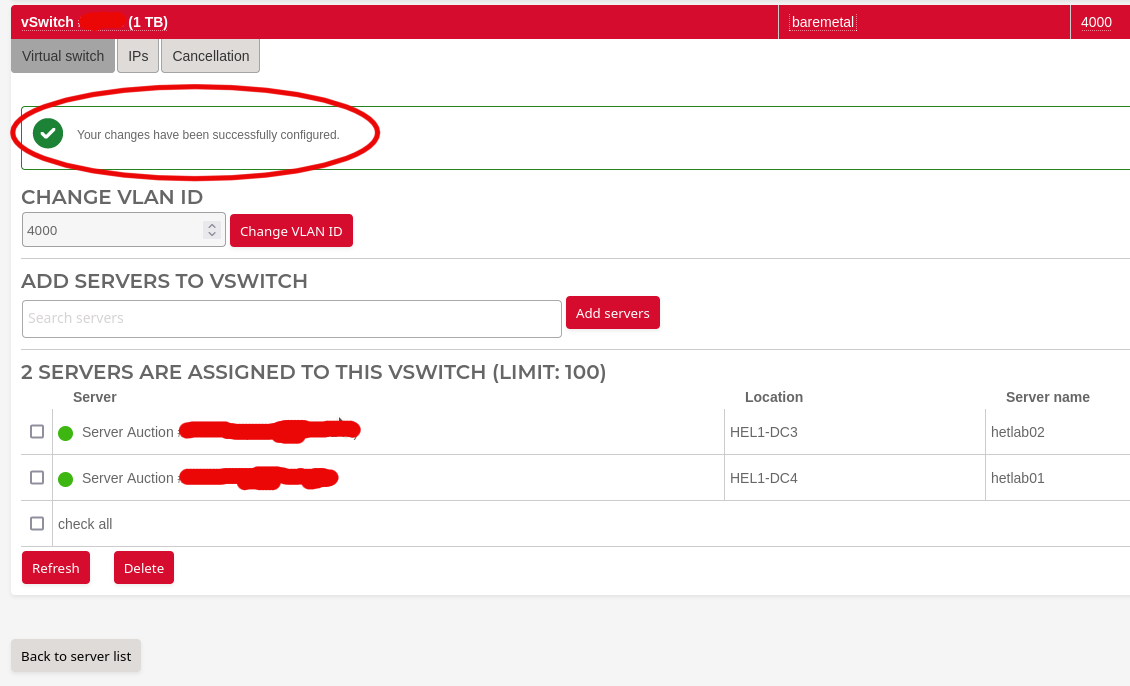
- add your servers to baremetal vSwitch:
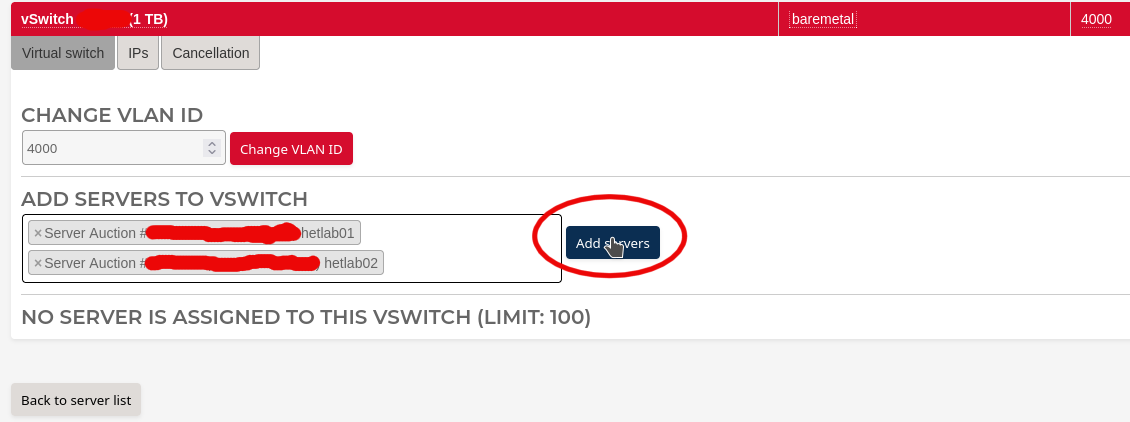
- wait until all servers are added to baremetal vSwitch:
Create your custom variables
These steps must not be run directly on your Root Server(s) because them will be rebooted in order to configure properly.
- clone ocp4-in-the-jars project in your box:
$ git clone https://github.com/amedeos/ocp4-in-the-jars
- cd into ocp4-in-the-jars directory:
$ cd ocp4-in-the-jars
- create your hosts-kvmhost file, where most important you need to choose one single baremetal_ip for each host; an example could be:
$ cat hosts-kvmhost
[kvmhost]
hetlab01 baremetal_ip=192.168.203.3 ansible_ssh_user=root ansible_ssh_common_args='-o StrictHostKeyChecking=no -o UserKnownHostsFile=/dev/null'
hetlab02 baremetal_ip=192.168.203.4 ansible_ssh_user=root ansible_ssh_common_args='-o StrictHostKeyChecking=no -o UserKnownHostsFile=/dev/null'
in my case, I use an ssh config file to resolve hetlab01 and hetlab02, but you can set ansible_ssh_host variable to default IP of your root server:
$ cat hosts-kvmhost
[kvmhost]
hetlab01 baremetal_ip=192.168.203.3 ansible_ssh_host=x.x.x.x ansible_ssh_user=root ansible_ssh_common_args='-o StrictHostKeyChecking=no -o UserKnownHostsFile=/dev/null'
hetlab02 baremetal_ip=192.168.203.4 ansible_ssh_host=y.y.y.y ansible_ssh_user=root ansible_ssh_common_args='-o StrictHostKeyChecking=no -o UserKnownHostsFile=/dev/null'
- test Ansible connection:
$ ansible -m ping all -i hosts-kvmhost -o -b
hetlab01 | SUCCESS => {"ansible_facts": {"discovered_interpreter_python": "/usr/libexec/platform-python"},"changed": false,"ping": "pong"}
hetlab02 | SUCCESS => {"ansible_facts": {"discovered_interpreter_python": "/usr/libexec/platform-python"},"changed": false,"ping": "pong"}
- create custom-variables.yaml file:
$ tee "custom-variables.yaml" > /dev/null <<'EOF'
baremetal_net:
  net: 192.168.203.0
  netmask: 255.255.255.0
  prefix: 24
  reverse: 203.168.192
  gateway: 192.168.203.1
  ntp: "103.16.182.23,103.16.182.214"
  dhcp_start: 192.168.203.90
  dhcp_end: 192.168.203.110
  mtu: 1400
  vlan: 4000
kvmhost:
  enable_selinux: True
  reboot_timeout: 1200
  enable_portfw: True
  replace_ddns_duckdns: False
  provisioning_bridge_create: True
  provisioning_bridge_isolated: False
  baremetal_bridge_create: True
  baremetal_bridge_isolated: False
  enable_baremetal_gw: True
  set_hostname: True
  set_hosts: True
  additional_hosts: personal_hosts.j2
  create_ssh_key: True
secure_password: XXXXXXX
rh_subcription_user: XXXXXXX
rh_subcription_password: XXXXXXX
rh_subcription_pool: XXXXXXX
EOF
replace last four variables secure_password, rh_subcription_user, rh_subcription_password and rh_subcription_pool with your correct data, if you have any doubt have a look at Install OpenShift baremetal IPI on homelab, using nested virtualization
- create custom-bm-ansible-nodes.json file, where inside it, you can choose where every VMs will be created (across your Root Servers);
for example master-0 will be created on hetlab01.example.com host, where redfish_ip match baremetal_ip into hosts-kvmhost file:
        {
            "name": "master-0",
            "state": "present",
            "hypervisor_name": "hetlab01.example.com",
            "hypervisor_user": "root",
            "hypervisor_ssh_key": "~/.ssh/id_rsa",
            "hypervisor_image_dir": "/var/lib/libvirt/images",
            "provisioning_mac": "52:54:00:00:32:00",
            "baremetal_mac": "52:54:00:00:33:00",
            "vbmc_pre_cmd": "",
            "vbmc_ip": "192.168.201.102",
            "vbmc_port": "623",
            "redfish_ip": "192.168.203.3",
            "redfish_port": "8000",
            "baremetal_ip": "192.168.203.53",
            "baremetal_last": "53"
        },
instead worker-0 will be created on hetlab02.example.com host:
        {
            "name": "worker-0",
            "state": "present",
            "is_odf": "true",
            "hypervisor_name": "hetlab02.example.com",
            "hypervisor_user": "root",
            "hypervisor_ssh_key": "~/.ssh/id_rsa",
            "hypervisor_image_dir": "/var/lib/libvirt/images",
            "provisioning_mac": "52:54:00:00:32:03",
            "baremetal_mac": "52:54:00:00:33:03",
            "vbmc_pre_cmd": "",
            "vbmc_ip": "192.168.201.13",
            "vbmc_port": "623",
            "redfish_ip": "192.168.203.4",
            "redfish_port": "8000",
            "baremetal_ip": "192.168.203.56",
            "baremetal_last": "56"
        },
have a look at custom-bm-ansible-nodes.json example file.
-
download pull-secret.txt from Red Hat Console and place it as pull-secret.txt; if you have any doubt have a look at Install OpenShift baremetal IPI on homelab, using nested virtualization
-
download RHEL 8.6 qcow2 file from Red Hat Downloads; if you have any doubt have a look at Install OpenShift baremetal IPI on homelab, using nested virtualization
Run Ansible playbook prepare-hypervisor.yaml
Now you can run the ansible playbook prepare-hypervisor.yaml:
ansible-playbook -i hosts-kvmhost --extra-vars "@custom-variables.yaml" prepare-hypervisor.yaml
this playbook will configure your Root Server.
Copy Custom variables
- copy RHEL 8.6 qcow2 file to all your Root Servers:
$ scp /tmp/rhel-8.6-x86_64-kvm.qcow2 hetlab01:/root/images/
$ scp /tmp/rhel-8.6-x86_64-kvm.qcow2 hetlab02:/root/images/
- clone repository on one Root Server:
$ ssh hetlab01
[root@hetlab01 ~]# git clone https://github.com/amedeos/ocp4-in-the-jars.git
- copy custom-variables.yaml file:
$ scp custom-variables.yaml hetlab01:/root/ocp4-in-the-jars/
- copy custom-bm-ansible-nodes.json file:
$ scp custom-bm-ansible-nodes.json hetlab01:/root/ocp4-in-the-jars/
- copy pull-secret.txt file:
scp pull-secret.txt hetlab01:/root/ocp4-in-the-jars/
Run the installation
Finally you can install OpenShift by running Ansible playbook main.yaml in a tmux session:
$ ssh hetlab01
[root@hetlab01 ~]# tmux

[root@hetlab01 ~]# cd /root/ocp4-in-the-jars
[root@hetlab01 ocp4-in-the-jars]# ansible-playbook --extra-vars "@custom-variables.yaml" --extra-vars "@custom-bm-ansible-nodes.json" main.yaml
wait 1-3 hours until the installation completes.