Configure Linux as an access point with hostapd, and tunnel traffic to (NordVPN) OpenVPN server
Introduction
In this simple how-to I’ll show you, how you can configure your Linux box, in my case Gentoo, to act as an access point for your trusted Clients (Laptops, PCs, mobile…) and route all their traffics through the tun interface which relates to an OpenVPN tunnel (in my case NordVPN); otherwise, with the second wireless interface, I’ll show you to configure it for your Guests wifi access point, routing their traffic directly to your xDSL router, or your router / default gateway in general, in order to:
- don’t share the same subnet of your clients with your untrusted guests;
- able to connect your IoT devices to internet and filter whatever you want, in this case an iptables firewall, but will be easy to add a transparent proxy;
- change your Internet IP daily for all your clients with a VPN service provider;
- route your SmartTV directly to your gateway in order to be able to stream media content from Netflix, Prime Video…;
- route traffic from your client to your guests (for example your SmartTV) but deny the opposite direction -> from guests to your clients.
Network topology / network flows
Below you can find a simplified architecture
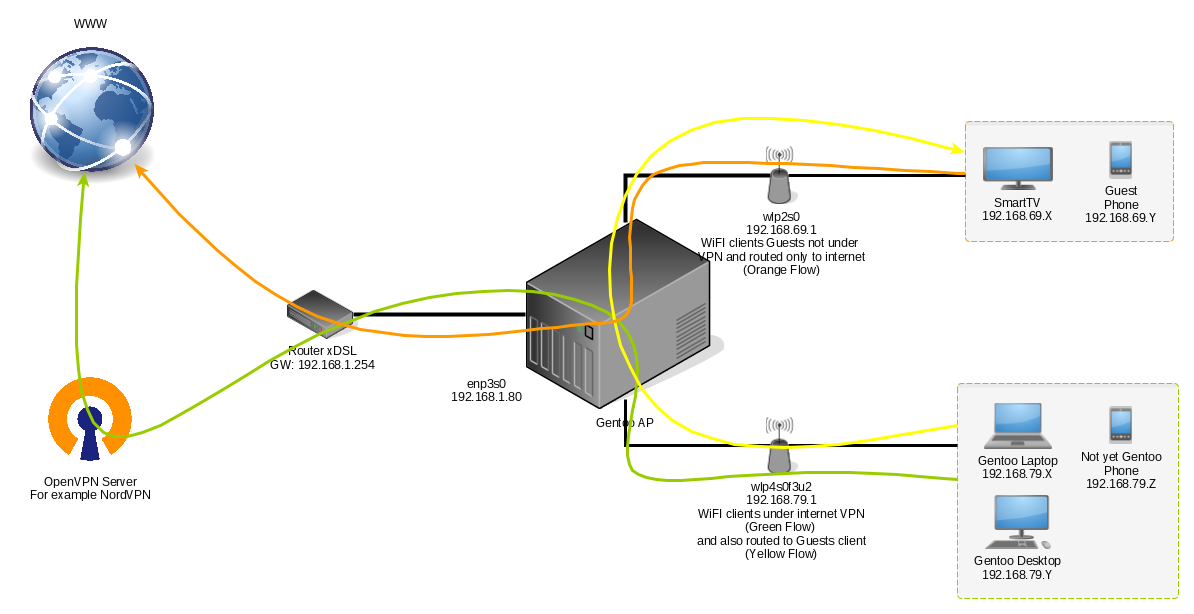 As you understood my Linux box has three physical interfaces, one gigabit ethernet enp3s0 with the IP 192.168.1.80, on the same subnet of the gateway 192.168.1.254 (I will assume that you know how to configure its IP and your default gateway) and two wireless interfaces, the first one in my case wlp4s0f3u2, with IP 192.168.79.1 which act as an access point for clients and wlp2s0, with IP 192.168.69.1 which instead act as an access point for your “untrusted” guests.
Kernel configuration (for Gentoo user)
General setup  --->
    Preemption Model  --->
        (X) Preemptible Kernel (Low-Latency Desktop)
Networking support  --->
    {*} Wireless  --->
        <M>   cfg80211 - wireless configuration API
            [*]     cfg80211 certification onus
            [*]       require regdb signature
            [*]         allow regdb keys shipped with the kernel
            [*]       cfg80211 support for NO_IR relaxation
        <M>   Generic IEEE 802.11 Networking Stack (mac80211)
    Networking options  --->
        [*] Network packet filtering framework (Netfilter)  --->
            Core Netfilter Configuration  --->
                SELECT ALL OPTIONS
Configure your ieee80211 region
Create a new file /etc/modprobe.d/cfg80211.conf with your region, in my case is Italy with its code IT:
# echo -e "options cfg80211 ieee80211_regdom=IT" > /etc/modprobe.d/cfg80211.conf
Install the software
Install net-wireless/hostapd, net-dns/dnsmasq, net-firewall/iptables, net-analyzer/macchanger and optionally, if you use NordVPN, you can install with layman, from my overlay amedeos-overlay, the package net-vpn/nordvpn-cli
# emerge --ask net-wireless/hostapd net-dns/dnsmasq net-firewall/iptables net-analyzer/macchanger
# layman -a amedeos
# emerge --ask net-vpn/nordvpn-cli
Configure network for wireless interfaces
I preferred to create a very simple script to configure the two wireless interfaces wlp2s0 and wlp4s0f3u2, and is available here setup-network.sh
# curl -o /usr/local/sbin/setup-network.sh https://raw.githubusercontent.com/amedeos/amedeos.github.io/master/files/hostapd/setup-network.sh
# chmod 0754 /usr/local/sbin/setup-network.sh
after downloading it, open the file /usr/local/sbin/setup-network.sh with vim and edit the two variable DEV and DEVGUESTS with your wireless interface name
# vim /usr/local/sbin/setup-network.sh
....
DEVGUESTS=wlp2s0 # <---- dev interface for guests
DEV=wlp4s0f3u2   # <---- dev interface for clients
....
create the systemd /etc/systemd/system/hostapd-network.service and /etc/systemd/system/hostapd-network.timer with the following content
# cat /etc/systemd/system/hostapd-network.service
[Unit]
Description=Setup network for hostapd
After=network-online.target nss-lookup.target

[Service]
ExecStart=/usr/local/sbin/setup-network.sh

[Install]
WantedBy=multi-user.target

# cat /etc/systemd/system/hostapd-network.timer
[Unit]
Description=Run hostapd-network 1 minutes after the boot

[Timer]
OnBootSec=1min

[Install]
WantedBy=timers.target
and enable only the systemd timer hostapd-network.timer
# systemctl daemon-reload
# systemctl enable hostapd-network.timer
Kernel tunables for routing
Default Gentoo configuration disable IP forwarding in /etc/sysctl.conf file, we need to enable it and tune some kernel parameters to increase the network performance and decrease the latency; just create the file /etc/sysctl.d/99-zz-router-ap.conf with the following content:
# cat /etc/sysctl.d/99-zz-router-ap.conf
net.ipv4.ip_forward=1

# log invalid tcp
#net.netfilter.nf_conntrack_log_invalid=6
# increase mem
#net.core.rmem_default=16777216
#net.core.wmem_default=16777216
#net.core.rmem_max=16777216
#net.core.wmem_max=16777216
#net.ipv4.tcp_mem=16777216 16777216 16777216
#net.ipv4.tcp_rmem=4096 87380 16777216
#net.ipv4.tcp_wmem=4096 87380 16777216
net.ipv4.neigh.default.gc_thresh1=1024
net.ipv4.neigh.default.gc_thresh2=10240
net.ipv4.neigh.default.gc_thresh3=16384
and reload the sysctl
# systemctl restart systemd-sysctl.service
Create new routing table in order to bypass VPN for guests network
If you want to route your guests directly to the xDSL router you can create a new iproute2 table wifiguests.
Insert a new line “10 wifiguests” inside the file /etc/iproute2/rt_tables
# echo "10 wifiguests" >> /etc/iproute2/rt_tables
This creates a new table reference called wifiguests, and now we can use it, activating this table when packet is coming from wifiguests subnet 192.168.69.0/24:
# ip rule add from 192.168.69.0/24 lookup wifiguests
and when wifi subnet 192.168.79.0/24 try to connect to the wifiguests 192.168.69.0/24:
# ip rule add from 192.168.79.0/24 to 192.168.69.0/24 lookup wifiguests
and finally we can insert the routing rules for our table wifiguests:
# ip route add default via 192.168.1.254 table wifiguests
# ip route add 192.168.79.0/24 dev wlp4s0f3u2 table wifiguests
# ip route add 192.168.69.0/24 dev wlp2s0 table wifiguests
Configure Netfilter with iptables
As a starting point, you can use my iptables-save rules-save, but remember to change the network interface names enp3s0, wlp4s0f3u2 and wlp2s0 with your interfaces!!!
# curl -o /var/lib/iptables/rules-save https://raw.githubusercontent.com/amedeos/amedeos.github.io/master/files/hostapd/rules-save
#
# vim /var/lib/iptables/rules-save
#
# systemctl start iptables-restore.service
# systemctl enable iptables-restore.service
Explain Netfilter rules
nat table
# cat /var/lib/iptables/rules-save
...
-A PREROUTING -i wlp4s0f3u2 -j ACCEPT
-A PREROUTING -i wlp2s0 -j ACCEPT
-A POSTROUTING -o enp3s0 -j MASQUERADE
-A POSTROUTING -o tun0 -j MASQUERADE
...
we accept prerouting from our wireless interfaces and we add in postrouting the masquerade (source natting) for our ethernet and tun interfaces.
filter table
# cat /var/lib/iptables/rules-save
...
-A INPUT -i wlp4s0f3u2 -j wifi-incoming-clients
-A INPUT -i wlp2s0 -j wifi-incoming-guests
-A INPUT -s 192.168.79.0/24 -d 192.168.1.80/32 -j service-incoming
-A INPUT -j REJECT --reject-with icmp-port-unreachable
-A FORWARD -i wlp2s0 -j wifi-filter-guests
-A FORWARD -i wlp4s0f3u2 -j wifi-filter-clients
-A FORWARD -m conntrack --ctstate RELATED,ESTABLISHED -j ACCEPT
-A FORWARD -i wlp4s0f3u2 -o enp3s0 -j ACCEPT
-A FORWARD -i wlp2s0 -o enp3s0 -j ACCEPT
-A FORWARD -i wlp4s0f3u2 -o wlp2s0 -j ACCEPT
-A FORWARD -i wlp4s0f3u2 -o tun0 -j ACCEPT
-A service-incoming -s 192.168.79.0/24 -p tcp -m multiport --dports 22,9091 -j ACCEPT
-A wifi-filter-guests -d 8.8.8.8/32 -j REJECT --reject-with icmp-port-unreachable
-A wifi-filter-guests -d 8.8.4.4/32 -j REJECT --reject-with icmp-port-unreachable
-A wifi-incoming-clients -p udp -m multiport --dports 53,67,68 -j ACCEPT
-A wifi-incoming-clients -p tcp -m multiport --dports 53 -j ACCEPT
-A wifi-incoming-guests -p udp -m multiport --dports 53,67,68 -j ACCEPT
where, in the wifi-incoming-(clients|guests) chains you can enable services / ports for your wifi clients (DNS, DHCP…), instead in the wifi-filter-(clients|guests) chains you can put your filter rules, and in the above example the IPs 8.8.8.8 and 8.8.4.4 will be rejected / filtered for your guests.
Regarding the forward rule will be accepted / forwarded from the two wifi interfaces wlp4s0f3u2 and wlp2s0 to the ethernet interface enp3s0, but also from the wlp4s0f3u2 (clients) will be accepted / forwarded to the wlp2s0 interface (due to permit traffic from clients to guests) and to the tun0 interface to permit traffic to your OpenVPN server.
Configure hostapd
Clients configuration
Create a new file /etc/hostapd/hostapd-wifi.conf with the following contents
interface=wlp4s0f3u2
driver=nl80211
logger_syslog=-1
logger_syslog_level=1
logger_stdout=-1
logger_stdout_level=1
ctrl_interface=/var/run/hostapd-wifi
ctrl_interface_group=0
ssid=YourWiFINetworName
country_code=IT
ieee80211d=1
hw_mode=a
##################
# CHOOSE A CHANNEL
##################
channel=36
beacon_int=100
dtim_period=2
max_num_sta=255
rts_threshold=-1
fragm_threshold=-1
macaddr_acl=0
auth_algs=1
ignore_broadcast_ssid=0
wmm_enabled=1
wmm_ac_bk_cwmin=4
wmm_ac_bk_cwmax=10
wmm_ac_bk_aifs=7
wmm_ac_bk_txop_limit=0
wmm_ac_bk_acm=0
wmm_ac_be_aifs=3
wmm_ac_be_cwmin=4
wmm_ac_be_cwmax=10
wmm_ac_be_txop_limit=0
wmm_ac_be_acm=0
wmm_ac_vi_aifs=2
wmm_ac_vi_cwmin=3
wmm_ac_vi_cwmax=4
wmm_ac_vi_txop_limit=94
wmm_ac_vi_acm=0
wmm_ac_vo_aifs=2
wmm_ac_vo_cwmin=2
wmm_ac_vo_cwmax=3
wmm_ac_vo_txop_limit=47
wmm_ac_vo_acm=0
ieee80211n=1
ieee80211ac=1
eapol_key_index_workaround=0
eap_server=0
own_ip_addr=127.0.0.1
wpa=2
wpa_passphrase=YOURSECRETPASSWORD
wpa_key_mgmt=WPA-PSK
rsn_pairwise=CCMP
edit the above configurations with the correct:
- interface
- channel
- wpa_passphrase
regarding the channel, I detected that most consumer wireless interfaces won’t be able to auto detect the best channel to use (parameter channel=0), so I suggest you to verify what channels are available:
# iw list
...
                Frequencies:
                        * 5180 MHz [36] (20.0 dBm)
                        * 5200 MHz [40] (20.0 dBm)
                        * 5220 MHz [44] (20.0 dBm)
                        * 5240 MHz [48] (20.0 dBm)
                        * 5260 MHz [52] (20.0 dBm) (no IR, radar detection)
                        * 5280 MHz [56] (20.0 dBm) (no IR, radar detection)
                        * 5300 MHz [60] (20.0 dBm) (no IR, radar detection)
                        * 5320 MHz [64] (20.0 dBm) (no IR, radar detection)
                        * 5500 MHz [100] (27.0 dBm) (no IR, radar detection)
                        * 5520 MHz [104] (27.0 dBm) (no IR, radar detection)
                        * 5540 MHz [108] (27.0 dBm) (no IR, radar detection)
                        * 5560 MHz [112] (27.0 dBm) (no IR, radar detection)
                        * 5580 MHz [116] (27.0 dBm) (no IR, radar detection)
                        * 5600 MHz [120] (27.0 dBm) (no IR, radar detection)
                        * 5620 MHz [124] (27.0 dBm) (no IR, radar detection)
                        * 5640 MHz [128] (27.0 dBm) (no IR, radar detection)
                        * 5660 MHz [132] (27.0 dBm) (no IR, radar detection)
                        * 5680 MHz [136] (27.0 dBm) (no IR, radar detection)
                        * 5700 MHz [140] (27.0 dBm) (no IR, radar detection)
                        * 5720 MHz [144] (disabled)
                        * 5745 MHz [149] (disabled)
                        * 5765 MHz [153] (disabled)
                        * 5785 MHz [157] (disabled)
                        * 5805 MHz [161] (disabled)
                        * 5825 MHz [165] (disabled)
                        * 5845 MHz [169] (disabled)
                        * 5865 MHz [173] (disabled)
...
in the above example, my wireless interface will be able to initiate radiation, for the 5G, only in channels 36, 40, 44 and 48.
Now we can add the systemd /etc/systemd/system/hostapd-wifi.service and /etc/systemd/system/hostapd-wifi.timer for hostapd-wifi
# cat /etc/systemd/system/hostapd-wifi.service
[Unit]
Description=Hostapd IEEE 802.11 AP
After=hostapd-network.service

[Service]
ExecStart=/usr/sbin/hostapd /etc/hostapd/hostapd-wifi.conf
CPUSchedulingPolicy=fifo
#CPUSchedulingPriority=40
Restart=on-failure
RestartSec=30

[Install]
WantedBy=multi-user.target

# cat /etc/systemd/system/hostapd-wifi.timer
[Unit]
Description=Run hostapd-wifi 2 minutes after the boot

[Timer]
OnBootSec=2min

[Install]
WantedBy=timers.target
enable on system boot only the timer
# systemctl daemon-reload
# systemctl enable hostapd-wifi.timer
Clients configuration
Create a new file /etc/hostapd/hostapd-wifiguests.conf with the following contents
interface=wlp2s0
driver=nl80211
logger_syslog=-1
logger_syslog_level=1
logger_stdout=-1
logger_stdout_level=1
ctrl_interface=/var/run/hostapd-wifiguests
ctrl_interface_group=0
ssid=YourWiFINetworNameGuests
country_code=IT
ieee80211d=1
hw_mode=g
##################
# CHOOSE A CHANNEL
##################
channel=2
beacon_int=100
dtim_period=2
max_num_sta=255
rts_threshold=-1
fragm_threshold=-1
macaddr_acl=0
auth_algs=1
ignore_broadcast_ssid=0
wmm_enabled=1
wmm_ac_bk_cwmin=4
wmm_ac_bk_cwmax=10
wmm_ac_bk_aifs=7
wmm_ac_bk_txop_limit=0
wmm_ac_bk_acm=0
wmm_ac_be_aifs=3
wmm_ac_be_cwmin=4
wmm_ac_be_cwmax=10
wmm_ac_be_txop_limit=0
wmm_ac_be_acm=0
wmm_ac_vi_aifs=2
wmm_ac_vi_cwmin=3
wmm_ac_vi_cwmax=4
wmm_ac_vi_txop_limit=94
wmm_ac_vi_acm=0
wmm_ac_vo_aifs=2
wmm_ac_vo_cwmin=2
wmm_ac_vo_cwmax=3
wmm_ac_vo_txop_limit=47
wmm_ac_vo_acm=0
ieee80211n=1
ieee80211ac=1
eapol_key_index_workaround=0
eap_server=0
own_ip_addr=127.0.0.1
wpa=2
wpa_passphrase=YOURSECRETGUESTS
wpa_key_mgmt=WPA-PSK
rsn_pairwise=CCMP
edit the above configurations with the correct:
- interface
- channel
- wpa_passphrase
Now we can add the systemd /etc/systemd/system/hostapd-wifiguests.service and /etc/systemd/system/hostapd-wifiguests.timer for hostapd-wifiguests
# cat /etc/systemd/system/hostapd-wifiguests.service
[Unit]
Description=Hostapd IEEE 802.11 AP for guests
After=hostapd-network.service

[Service]
ExecStart=/usr/sbin/hostapd /etc/hostapd/hostapd-wifiguests.conf
CPUSchedulingPolicy=fifo
#CPUSchedulingPriority=40
Restart=on-failure
RestartSec=30

[Install]
WantedBy=multi-user.target

# cat /etc/systemd/system/hostapd-wifiguests.timer
[Unit]
Description=Run hostapd-wifiguests 3 minutes after the boot

[Timer]
OnBootSec=3min

[Install]
WantedBy=timers.target
enable it on system boot only the timer
# systemctl daemon-reload
# systemctl enable hostapd-wifiguests.timer
Configure dnsmasq
I chose to use dnsmasq as DNS and DHCP server for all clients, but by default dnsmasq daemon will listen to all interfaces, so let’s limit to only one interface.
Client configuration
Create a new file /etc/dnsmasq-wifi.conf with the following content:
strict-order
interface=wlp4s0f3u2
except-interface=lo
listen-address=192.168.79.1
bind-dynamic
dhcp-range=192.168.79.50,192.168.79.150,255.255.255.0,12h
dhcp-leasefile=/var/lib/misc/dnsmasq-wlp4s0f3u2.leases
log-dhcp
Now we can add the systemd /etc/systemd/system/dnsmasq-wifi.service and /etc/systemd/system/dnsmasq-wifi.timer for dnsmasq-wifi
# cat /etc/systemd/system/dnsmasq-wifi.service
[Unit]
Description=A lightweight DHCP and caching DNS server for wireless interface
After=hostapd-wifi.service

[Service]
Type=simple
ExecStartPre=/usr/sbin/dnsmasq --test --conf-file=/etc/dnsmasq-wifi.conf
ExecStart=/usr/sbin/dnsmasq --conf-file=/etc/dnsmasq-wifi.conf -k --user=dnsmasq --group=dnsmasq --pid-file=/var/run/dnsmasq-wifi.pid
ExecReload=/bin/kill -HUP $MAINPID

[Install]
WantedBy=multi-user.target

# cat /etc/systemd/system/dnsmasq-wifi.timer
[Unit]
Description=Run dnsmasq-wifi 2 minutes after the boot

[Timer]
OnBootSec=2min

[Install]
WantedBy=timers.target
enable only the timer on system boot
# systemctl daemon-reload
# systemctl enable dnsmasq-wifi.timer
Guest configuration
Create a new file /etc/dnsmasq-wifiguests.conf with the following content:
strict-order
interface=wlp2s0
except-interface=lo
listen-address=192.168.69.1
bind-dynamic
dhcp-range=192.168.69.50,192.168.69.150,255.255.255.0,12h
dhcp-leasefile=/var/lib/misc/dnsmasq-wlp2s0.leases
dhcp-option=6,1.1.1.1
log-dhcp
Now we can add the systemd /etc/systemd/system/dnsmasq-wifiguests.service and /etc/systemd/system/dnsmasq-wifiguests.timer for dnsmasq-wifiguests
# cat /etc/systemd/system/dnsmasq-wifiguests.service
[Unit]
Description=A lightweight DHCP and caching DNS server for wireless interface guests
After=hostapd-wifiguests.service

[Service]
Type=simple
ExecStartPre=/usr/sbin/dnsmasq --test --conf-file=/etc/dnsmasq-wifiguests.conf
ExecStart=/usr/sbin/dnsmasq --conf-file=/etc/dnsmasq-wifiguests.conf -k --user=dnsmasq --group=dnsmasq --pid-file=/var/run/dnsmasq-wifiguests.pid
ExecReload=/bin/kill -HUP $MAINPID

[Install]
WantedBy=multi-user.target

# cat /etc/systemd/system/dnsmasq-wifiguests.timer
[Unit]
Description=Run dnsmasq-wifiguests 3 minutes after the boot

[Timer]
OnBootSec=3min

[Install]
WantedBy=timers.target
enable only the timer on system boot
# systemctl daemon-reload
# systemctl enable dnsmasq-wifiguests.timer
Configure NordVPN (for Gentoo user)
Finally, we can configure VPN tunnel to automatically start at boot, and restart every day, due to change NordVPN server; in my amedeos-overlay I packaged this tool https://gitlab.com/mausworks/nordvpn-cli with a simple bash script update-nordvpn.sh to call it.
Enable amedeos overlay and install net-vpn/nordvpn-cli
# layman -a amedeos
# emerge --ask net-vpn/nordvpn-cli
Now we can add the systemd /etc/systemd/system/update-nordvpn.service and /etc/systemd/system/update-nordvpn.timer for update-nordvpn
# cat /etc/systemd/system/update-nordvpn.service
[Unit]
Description=Update nordvpn DB and configure with the desired country

[Service]
Type=oneshot
#ExecStart=/usr/sbin/update-nordvpn.sh "United States"
ExecStart=-/bin/ip route add 192.168.79.0/24 dev wlp4s0f3u2 table wifiguests
ExecStart=-/bin/ip route add 192.168.69.0/24 dev wlp2s0 table wifiguests
ExecStart=/usr/sbin/update-nordvpn.sh Italy

# cat /etc/systemd/system/update-nordvpn.timer
[Unit]
Description=Run update-nordvpn 4 minutes after the boot

[Timer]
OnBootSec=4min
OnUnitActiveSec=1d

[Install]
WantedBy=timers.target
enable only the timer on system boot
# systemctl daemon-reload
# systemctl enable update-nordvpn.timer
Reboot
Now you can reboot and enjoy your Linux Access Point
# shutdown -r now